Steam Smart Pro Carpet Duct & Tile Cleaning 

How to Clean Up Backed-up Sewage

SEO CH • 30 October 2023

If you experience sewage problems, you may be wondering how to clean up backed up sewage correctly.


Sewer backups require extensive cleanups, but most importantly, after clean up, it’s crucial to the bottom of the affected area. Hence, health hazards stay minimized, and future backups do not occur.


After properly disposing of and cleaning up any hazardous sewage backup leakage and remnants, you’ll need trusted water damage restoration in Tucson from a team of plumbing experts. Continue reading for more information on how to clean up sewage water safely and what to do after clean-up.


The First Steps After Sewage Backups

The first steps after sewage backup are equally important to protect your home and your loved ones. Follow these guidelines below before you begin any cleaning, and when in doubt, call in a professional team that handles cleaning and remodeling. 


Protect Loved Ones

If you experience a sewage backup, the first step is to have any vulnerable people in your home, like children and the elderly, stay away from the sewage backup. Removing any pets that may get into the standing water is also essential, as it poses a dangerous threat to their health.


Turn Off Electrical

After removing any vulnerable loved ones and pets, the next step is to turn off the electricity in the area. If your electrical panel is underwater, you do not want to touch the panels because there's a high risk of electrocution. 


To switch it off, you can use something that does not allow electricity to flow through it, like a rubber handle, rubber gloves, or a stick. Just make sure the chosen one is dry before using it to switch off any fuses in the electrical box. 


Contact Utilities for Water

After Switching off the electricity,  you need to turn off the water in your home as well.  Some homes have a water valve where you can turn it on and off to prevent extra water from flowing while experiencing your sewage back.  However, sometimes, you have to call your specific utility company for them to shut off the main water supply.  When in doubt, speak to professionals to safely turn off your water.


Ventilate

The final step before the cleaning begins is to ventilate the home. When sewage water flows back into the home, you must open your doors and windows, if the weather permits, to get air ventilation. Do not turn on the air conditioner or heater because these systems can spread dirty and bacteria-filled air throughout the home. 


Cleaning Sewage Water

Thoroughly cleaning up sewage water is essential to avoid hazardous conditions. However, sewage water cleanup has specific steps that homeowners should follow to keep their homes safe. 


Wear Personal Protection

Before cleaning, wear personal protective gear like gloves, eye protection, rubber shoes, and a face mask. These measures protect you from touching any contaminated water.


Separate Wet/Dry Areas

After you have the appropriate protective gear, you’ll want to analyze the sewage backup to see any dry spaces. For example, if only one room is wet and has water, but the surrounding rooms are completely dry, you’ll want to close off the dry areas to avoid the water seeping in. Since these areas are not contaminated, you must keep the two separated to save time, money, and resources.


Remove Sewage Water

Next, it’s time to remove the contaminated sewage water. Typically, homes will have sump pumps to help drain water. However, this may not work with the quantity of water. In this scenario and for homes without any back-up draining system, you’ll need a wet/dry shop vacuum to suck out and remove the sewage water from the area. Professionals have large-scale pumps that get rid of the water faster than at-home devices can.


Rid of Saturated Items

As you get rid of the sewer water, you’ll want to dispose of any highly saturated and heavily damaged items. For example, porous things like carpets, upholstered items, and wall paneling that cannot easily be cleaned or disinfected will likely have to be thrown away and replaced.


Open Windows

After the base level of sewage water is gone, it’s time to ventilate the area again by opening windows and using a dehumidifier. Doing so helps the space air out, bringing in fresh air. Weather permitting, this should allow the area to dry out to help mitigate mold or rot issues.


Wash Windows & Walls

The final DIY cleaning step after a sewage backup is to wash down the windows, walls, and baseboards. This is the only way to properly disinfect the areas exposed to contaminated water. Typically, you’ll use a bleach and water solution to kill any potential mold and a standard detergent on more sensitive areas like the floor.
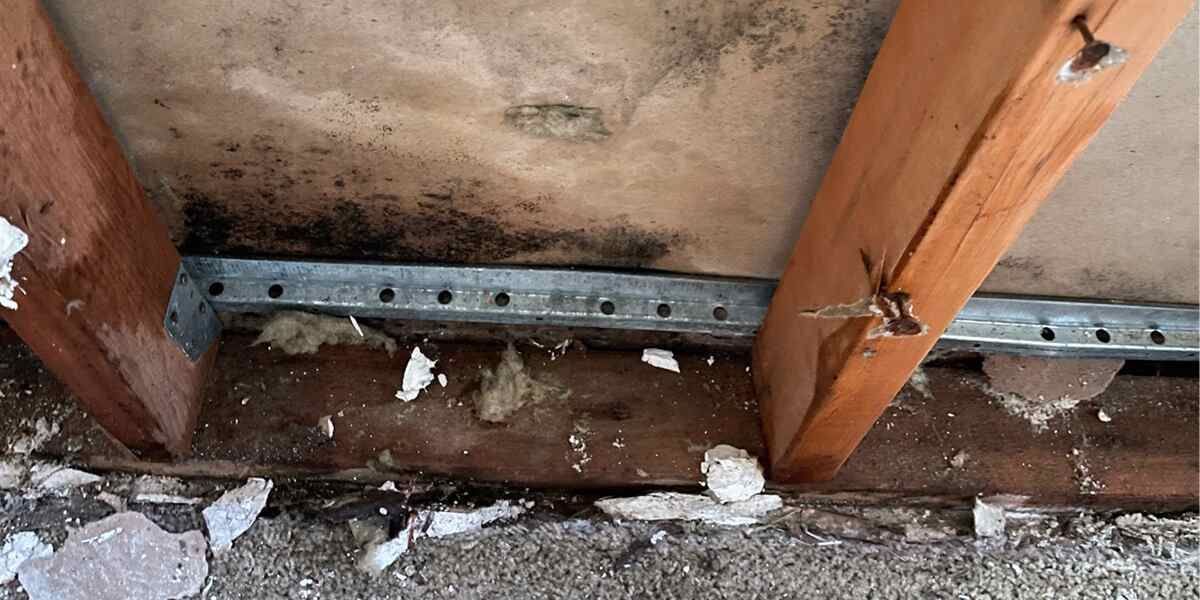

Mold Inspection

Once the area is clean and fully dry, you must complete an inspection for mold. Mold tends to grow with a high humidity level and water that sits over time. Mold not only harms your health but can also damage the Integrity of your home. Make sure to have a professional contractor inspect surfaces for mold and get remediation as quickly as possible if you notice any signs.


Common Causes of Sewage Backups

There are many different causes for sewage backups. Commonly, it's due to an improperly functioning septic system, a clogged sewer line, leaky pipes, or tree roots entering minor cracks in your sewer line and damaging the pipes.


Whatever the source, getting to the root cause of the sewage backup is the only way to prevent it from happening again.


Call Professionals to Clean, Remediate, & Restore 

If you experience sewage backup, you do not have to tackle it alone. After cleanup, let Steam Smart Pro perform a water damage restoration to avoid any potential mold growth and ensure your home’s health by allowing professional cleaners to sanitize your basement after a flood


So, Instead of wondering how to clean up backed up sewage and get rid of sewage water, rely on professionals. Call Steam Smart Pro at (520) 416-4308 for an instant quote for your water damage restoration today!

Our Recent Post

by Eric Bullard 12 July 2024
Discovering an unknown and unpleasant odor in your home is always concerning. One commonly unsuspected culprit of a “smoke”, or “burning” smell comes from a home’s AC (air duct) system. If your air ducts have a lingering smell of smoke, here are six reasons why, and what to do about it. 1) Dirty Air Filter The first thing you should check is your air filter. Having a dirty air filter can not only cause unpleasant odors, but it can also lead to weak performance of your unit, many times even causing it to overheat. This is due to the filter being clogged with dirt and debris, leading to restricted air flow. Solution: Replacement of old air filter. This can easily be done at home with the help of a ladder. Make sure you have the correct measurements of the filter, as they vary in many different sizes. Read your owner’s manual to find out how often you should replace your filter. 2) Failing HVAC system In some cases, a malfunctioning HVAC system can cause a “burning” smell to emit from your air ducts. If there is a problem with any of your HVAC components, it can produce a burning odor that can be mistaken for smoke. There are 2 main faulty components that you should be wary of: Broken Fan Belt - Burning smell accompanied by a squealing noise. Overheated Fan Motor - Burning smell due to overheating. This is a serious issue that should be addressed ASAP. Solution: Keeping up on regular maintenance of your HVAC system. It is important to make sure each of these parts are fixed or replaced by a professional technician to ensure a safe installment, and prevent any further damage to your unit. 3) Electrical Failure A lingering burning smell followed by a popping sound in the same area can be a sign of an electrical failure. The burning smell may be a result of sparks and heat build up. Solution: If you believe it can be an electrical failure, be sure to turn your AC unit off immediately and contact a technician to take a look at it. Electrical failure should only be handled by a professional with proper safety training. 4) Damaged Capacitor The capacitor is responsible for storing electrical energy and helps to start the AC unit's compressor. The capacitor can cause a burning smell if there is regular overheating. Some signs of damage include: AC not starting up Strange noises coming from unit Capacitor is visibly damaged or swollen Solution: Attempting to repair this yourself can be extremely dangerous, so be sure that you contact a professional technician right away! 5) Debris build-up Over time, dirt and debris can accumulate in your ductwork and its components. When your unit is turned on for the first time in a while, it can cause the unit’s fan blades to create a musty odor that can be mistaken as smoke. Solution: Regular air duct cleaning is essential to preventing debris buildup + keeping your home smelling fresh. 6) Smoke Byproducts If you or any previous owners have ever smoked inside the home, it is likely that your air ducts are coated in smoke byproducts such as nicotine and tar. Solution: Hiring a professional to clean your air ducts will help rid of any smoke byproducts + odor particles, as well as any dust and debris that have accumulated over time. There are many health benefits to regular maintenance of your air ducts . Conclusion Overall, if you're experiencing a burning smell coming from your AC unit, it is essential to address the issue promptly. It is best to hire professional technicians with safety training to take a look at any issues with your air ducts in order to prevent further damage to the unit, or any harm to yourself. Regular maintenance of your air duct system has endless benefits, resulting in a long-lasting unit that keeps your home safe and comfortable all year long. In need of professional Air Duct Cleaning in Tucson, AZ? Steam Smart Pro is your solution! Schedule online or call (520)416-4308 for a FREE quote today!
8 June 2024
Tile and grout surfaces can add beauty and functionality to any home, but they require regular maintenance to keep them looking their best. Proper care and maintenance of your tile and grout can help prolong their life and preserve their appearance for years to come. In this blog post, we will share some essential maintenance tips to help you maintain your tiled surfaces in top condition. 1. Regular Cleaning Regular cleaning is key to maintaining the appearance of your tile and grout surfaces. To do this, sweep or vacuum your tiled floors regularly to remove dirt and debris that can scratch and dull the tiles. Use a mild cleaning solution and a soft brush or mop to clean tile and grout surfaces regularly to prevent staining and discoloration. If you happen to have rust on your tile that needs cleaning, click here to find the simple DIY solution! 2. Sealing Seal your tile and grout surfaces to protect them from stains, moisture, and dirt. Sealing creates a protective barrier that helps prevent grime and water from penetrating and seeping into the porous surfaces of tiles and grout. It is recommended by professionals that we reseal our tile and grout surfaces at least once every year to maintain their protective properties. 3. Grout Maintenance Grout is porous and prone to staining and discoloration. To keep your grout looking clean and fresh, regularly clean and scrub grout lines with a grout brush and a mild cleaning solution. Avoid using harsh chemicals or abrasive cleaners that can damage the grout. Consider applying a grout sealer to protect and prolong the life of your grout. 4. Preventative Measures To prevent damage and wear on your tile and grout surfaces, use mats or area rugs in high-traffic areas, such as entryways and hallways. You can also place felt pads under furniture legs to prevent scratching and scuffing your tile floors. Finally, be sure to wipe up any spills and stains immediately as they happen to prevent fluids from seeping into the grout and causing permanent damage that could be avoided! 5. Professional Cleaning While there is no doubt that regular maintenance is essential, professional tile and grout cleaning is always recommended in order to better deep clean and sanitize your tiled surfaces. Professional cleaners have the expertise, equipment, and cleaning solutions to effectively remove deep-seated dirt, stains, and bacteria from tile and grout surfaces. By following these 5 simple maintenance tips, you can prolong the life and appearance of your tile and grout surfaces, as well as ensure its functionality in your home for years to come. Always remember that proper care and maintenance are both essential when it comes to ensuring that your home is always looking its best! Looking for Tile + Grout cleaning in Tucson, Arizona, that will leave you floored? Call Steam Smart Pro at (520) 416-4308 today for a FREE estimate every time!
8 June 2024
Carpet cleaning has always played an overlooked yet crucial role when it comes to maintaining a tidy home. However, there are many misconceptions and myths surrounding carpet cleaning that can lead to confusion and the spread of misinformation. It’s important that we debunk some of the most common misconceptions about carpet cleaning to help you make informed decisions when it comes to caring for your home’s carpets! Misconception #1: Vacuuming is enough to keep carpets clean Regular vacuuming is undeniably an important step in removing surface dirt and debris from carpets, but it is not quite enough to eliminate deep-seated dirt, allergens, and bacteria. Professional carpet cleaning is necessary to thoroughly clean and sanitize carpets, ensuring a healthy indoor environment for you and your family. Misconception #2: Carpet cleaning can damage carpets It is believed by some that carpet cleaning can damage carpets, cause them to shrink or make them lose their shape. However, when done correctly by trained professionals using the correct methods + equipment, carpet cleaning can actually extend the life of your carpets, with the plus of keeping them looking fresh and vibrant. Misconception #3: DIY carpet cleaning is just as effective as professional cleaning While DIY carpet cleaning methods such as using rental carpet cleaning machines or homemade cleaning solutions may seem cost-effective, they often do not provide the same level of deep cleaning and sanitization as professional carpet cleaning. Professional carpet cleaners have the equipment, and specialized cleaning solutions and the specialized expertise to effectively remove tough stains, odors, and allergens from carpets. Misconception #4: Carpets should only be cleaned when they appear dirty Many homeowners wait until their carpets look visibly dirty before scheduling a professional cleaning. However, regular carpet cleaning is essential for maintaining a healthy indoor environment, even if your carpets appear clean. Over time, carpets can accumulate dust, allergens, bacteria, and other contaminants that are often not visible to the naked eye, making regular cleaning crucial for your health and well-being. Misconception #5: All carpet cleaning methods are the same There are various carpet cleaning methods available, including steam cleaning, dry cleaning, and hot water extraction. Each method has its own advantages and is suitable for different types of carpets and cleaning needs. It is important to choose a reputable company that uses the right cleaning method for your specific carpets to ensure optimal results. Since reading this article, you now know that it is super important to separate fact from fiction when it comes to home maintenance. There are many health benefits that come from carpet cleaning, as well as many other overlooked aspects of your home. By debunking these common misconceptions today, we hope that you can now make informed decisions when it comes to cleaning and maintaining your home’s carpets! Need professional carpet cleaning in Tucson, Arizona? Call Steam Smart Pro at (520) 416-4308 today to book a FREE quote!
SEE MORE

Request A Free Estimate

Free Estimate Form

Share by: